Box is friendlier than Dropbox for older Macs

Ever since Dropbox dropped support for PowerPC Macs running Mac OS X 10.4 and 10.5, I’ve been trying to find a viable alternative to sync selected files and folders between my main Intel Mac, my iOS devices, and my various PowerPC machines. It was so great when Dropbox worked because I generally use my main Intel Mac at home, and tend to bring with me my PowerBook G4s when out and about. As I mentioned in A modicum of synchronisation, “When Dropbox worked, my workflow was excellent. I kept everything in sync without effort. I started working on documents on the PowerBook G4 to finish them later at home on the MacBook Pro, and vice versa. It was a seamless process.”

In the comments to that article, I was pointed to this thread at MacRumors, which explains how to make Dropbox work again if you’re using a PowerPC Mac with Mac OS X 10.5 Leopard. I haven’t tried this solution because I also have three Macs running Mac OS X 10.4 Tiger, and I’d really like to sync as many machines as possible.

In addition to the options I outlined in A modicum of synchronisation, in recent times I have often resorted to browsing my Dropbox archive using the web interface. However, and I don’t know since when exactly, I haven’t been able to simply download files from Dropbox to my local machine through the web interface (using TenFourFox, which seems to be the only browser to at least load the Dropbox web interface properly). Instead of regular files, like, say, chapter-23.rtf, I get things like wjdv6xxq.part. Frustrated, I’ve simply copied all the folders I want to keep in sync to my Box.com account, and have started using Box, which has a much friendlier web interface, that loads faster and is generally more reliable.

But it’s not all. The other day I discovered that Box supports WebDAV. In this support article, they explain how to set it up, the known issues, and so on. This is a great option because you can use (as suggested) a third-party client to access and manage the files and folders in your Box account, and it’s much more convenient than using the web interface to download and upload files. I have used Panic’s Transmit 4.2 and it works great, though I haven’t been able to use the Transmit Disk feature to mount the remote volume on the desktop and use this solution in a more Dropbox-like way (when I try, a kernel panic is triggered). You can download Transmit from here, but remember that it’s not freeware: you’ll have to purchase a licence to use it.

It gets better: you can use Goliath, a long-standing, more bare-bones WebDAV client, which presents some advantages: it still works, it’s free, and it’s available for much older versions of Mac OS: the classic Mac OS version requires Mac OS 8.1 or higher. The Carbon version runs on any Mac OS X version greater than 10.0.4. This means that you can theoretically use even older Macintoshes to connect to Box via WebDAV. (I say ‘theoretically’ simply because I haven’t tried myself yet, but I will soon. I’ll use my iBook G3/300 running Mac OS 9.2.2 and my PowerBook 1400 running Mac OS 8.1 and will update this information at a later date.)

Goliath’s interface is simple and effective:

#alttext#

You can expand folders by clicking on the triangle next to their names, or you can double-click on a folder and have it open in a new window. It’s very easy to upload a file to a folder in your Box account: you just drag from the Finder and drop it on the destination folder in the Goliath window. To avoid having to type the WebDAV address of your Box ‘drive’ and your credentials every time, you can save them by selecting File > Save connection (⌘-S).

#alttext#

Next time you need to access your Box stuff with Goliath, you simply select File > Open connection (⌘-O). I really hope Box doesn’t remove the WebDAV functionality in the future, because it’s really useful and convenient to have quick access to your files stored in the Box cloud even from older machines. It’s another little feature that helps to put them to good use.

Addenda

[Update 1 – 19 Jul 2017] • Jeremy Sherman reminded me that WebDAV is supported directly by Mac OS X’s Finder itself since Mac OS X 10.0 (!). This means that you can simply select Go > Connect to Server (⌘-K) in the Finder, and enter Box’s WebDAV server address (https://dav.box.com/dav). In the following dialog, you’ll be requested your Box account credentials:

Box WebDAV from Finder.png


The good thing is that this solution is even more integrated with the system and works with basically any version of Mac OS X. I maintain my suggestion to use Goliath because on older machines with G3 processors it feels a little bit faster, and because it’s still a good option for Macs running Mac OS 8.1 to 9.2.2.

[Update 2 – 20 Jul 2017] • I performed some tests on my clamshell iBook G3/300 running Mac OS X 10.3.9 and Mac OS 9.2.2. I tried connecting to my Box account via the Finder under Mac OS X 10.3.9, but I got an error -36. Using Goliath, everything went well. Under Mac OS 9.2.2, I had no problems connecting to my Box account with Goliath. Navigating folders and accessing files was pleasantly fast. Now I’m updating this article while out and about, using my 12-inch PowerBook G4, and I can add this screenshot that was uploaded directly to Box from the iBook with Mac OS 9.2.2:

#alttext#

Maybe I’m not the first to have realised it, but I think this is a big deal, and a huge improvement to my workflow, much more seamless than before. Thanks to WebDAV support in Box, and thanks to a client like Goliath, you can have access to a modern cloud service with — in this instance — an 18-year old Mac running a 16-year old system software. Tonight I will conduct further testing on the PowerBook 1400c with Mac OS 8.1. If all goes well, I’ll be able to connect to Box using a Mac from 1996 running an OS version introduced in 1998.

It’s also a big deal because transferring files between obsolete Macs, vintage Macs, modern Macs and even iOS devices has become much faster and much more seamless than before. And I can quickly upload to the cloud any file I may have archived on vintage media (floppies or ZIP disks, for example) without having to figure out which vintage Mac I have to use as intermediary to move files from a machine to another.

[Update 3 – 21 Jul 2017] • I finally had the chance to do some testing on my PowerBook 1400c (with Sonnet Crescendo G3/333 upgrade) running Mac OS 8.1. I downloaded and installed Goliath, but when I launched it I was greeted with an error, saying that the application couldn’t be opened because the file ICAp;InternetConfigLib was missing. After a bit of research, it appears that the reason was that I needed a newer Internet Config Extension than the one installed in the PowerBook (v. 1.3). Using TomeViewer, I extracted a newer version (2.0.2) from the Installation CD of Mac OS 8.5, hoping it wasn’t too new, and dropped it in the System Folder. I restarted the Mac, relaunched Goliath, and all was well. After filling in the relevant credentials, I was able to connect to my Box account:

#alttext#


One thing I noticed is that — presumably to maintain a proper secure connection — when I attempted a few copy operations at first, I frequently saw this dialog popping up:

#alttext#


But it went away after checking the Install certificate option and confirming a couple of times.

I’m very glad this is working even under Mac OS 8.1. Accessing Box via WebDAV really gives this cloud service the widest system compatibility. I have two other PowerPC machines running Mac OS 8.1, the PowerBook 5300ce and the Power Macintosh 9500, that are even slightly older than the 1400; it’s exciting to be able to exchange files through Box with these older Macs I still use. Of course, another thing I’ve noticed is that uploading and downloading isn’t a particularly fast operation, possibly due to the slower network speeds and slower CPUs of these machines. But it’s still useful when uploading the occasional screenshot or image, or a bunch of text files. It may not be a fast process under Mac OS 8, but it’s still seamless. I can write without distractions on the PowerBook 1400c, upload the document to Box, then finish it (if necessary) on the iPad or MacBook Pro.

Another thing worth noting: I don’t know if this happens when mounting the Box WebDAV volume with the Finder as opposed to using Goliath, or if this happens no matter which method you use to access your Box account and files, but every copy operation leaves a ‘ghost’ file bearing the same name of the file you copied, but preceded by ‘._’ — you can see it when accessing Box from an iOS device:

#alttext#


It’s a bit of an annoyance, but I think these files can be deleted without problems.

[Update 4 – 24 Jul 2017] • Jeremy Sherman again (a very big thank-you to him, by the way): Suspect those ghost files are Apple Double files – they’re the resource fork of your files. Data fork goes in SomeFile, resource fork in ._SomeFile. And I agree. Jeremy’s been reminding me of things I knew but forgot over time.

[Update 5 – March 2020] • Apologies for being so slow in updating this document. As you’ve certainly seen in the comments, Arthur Lee points to this Box Support article where Box states:

As of October 25, 2019, Box has ended WebDAV support. If you have been using WebDAV you can continue to use it, as described in this article below. But we are no longer resolving any issues that may arise as a result.

Box recommends using third-party clients for mapping a drive to Mac OS X.

While the article says, If you have been using WebDAV you can continue to use it, I have made a few tests under Mac OS X 10.4 Tiger and 10.5 Leopard, and I wasn’t able to connect to my Box account. Under both Tiger and Leopard, the following happens:

  • When using the Finder to connect to https://dav.box.com/dav, the connection wasn’t established. I got a ‘server not found’ kind of error.
  • When using Goliath to connect to https://dav.box.com/dav, whether I added my account login credentials or not, Goliath would open an empty window.

This setback really annoys me. Sure, one could always resort to accessing Box via a browser (TenFourFox, of course), but the WebDAV method was more elegant and less resource-hungry.

This document will be updated as more information becomes available.

The Duo 280c is alive after all

From Duo System

I’ve always loved the idea behind the PowerBook Duo system, so much I think it could still be handy today without feeling obsolete. (Today we have notebook computers that can transform into tablets, no? So the concept still stands). I was really happy back in 2000 when I acquired a full Duo system consisting of a PowerBook Duo 280c, Duo MiniDock, the DuoDock II, a 14-inch Apple colour display, and an AppleDesign keyboard plus ADB mouse II. I remember using this system rather frequently in the 3-4 years following the acquisition and before purchasing a second-hand clamshell iBook G3/466. I had a battery for that Duo with enough juice to last me about a couple of hours, so I could use the Duo 280c while commuting, then recharge it while I was at the university, then more writing on the train back home and, once home, I would insert the Duo in its Dock and continue where I left off, but on a bigger display and with a full-sized keyboard.

Then the problems started. One day, after a power surge, the DuoDock II power supply died. At the time I didn’t have the options I would have today if I wanted to search for a replacement. At a local shop and Apple reseller they told me they could import the part, but when they gave me an estimate of the final price, I decided it was not worth the trouble. From then on, I would use the Duo MiniDock instead. The loss of the DuoDock meant having to extract the internal hard drive (that was bigger in storage size than the 230 MB internal one of the Duo 280c) and put it in an external SCSI enclosure. Not being able to use the DuoDock floppy drive was another loss, as it was one of the most reliable units I had ever used. Luckily I still managed to handle floppies by connecting the external floppy drive of my PowerBook 100 [image source]. I also lost Ethernet connectivity (the Duo MiniDock doesn’t have an Ethernet port), but since it was mainly used for transferring files locally, I switched to LocalTalk; slower, but better than nothing. I was still able to use the Duo in desktop configuration by connecting the 14-inch display and the AppleDesign keyboard via the MiniDock.

Then the problems continued: the display stopped working, but I had another available from another acquisition; but then of course the DB15 cable broke down. At that point I didn’t have much time to take care of what appeared to be a streak of Duo-related bad luck, so I just used the main Duo 280c unit when out and about, because it was still the lightest, most compact option for writing when not at home.

Fast forward to late 2014: one day, for no apparent reason, the Duo 280c stopped working. By that time, my vintage Mac collection had grown, and I had other machines readily available to keep carrying out the tasks I used the Duo for. But no other portable Mac was that compact and lightweight. Losing the PowerBook Duo 280c was a blow.

Imagine my joy when a very generous donor contacted me and sent me — among many other things — a complete Duo workstation with another 280c unit that was even better configured than mine (more RAM, more storage space). For a while, I enjoyed having such a workstation on my desk again. It was a bit like going back to those years when I was making the most out of it. Unfortunately, the power supply in that newer DuoDock II died shortly after. That generous donor was awesome enough to send me another power supply — which lasted for about three months. Both power supply units showed the dreaded ‘tick of death’.

Fast forward to three days ago. I’ve now moved to another apartment, and after finally settling down, I’m doing a general check-up of all my vintage machines. I plug in the Duo, and it doesn’t boot. Since everything was working seven weeks before, the first thing I thought was that I had to reset the Power Manager. I followed the instructions, but to no avail. The Duo still didn’t boot. This useful article on TidBITS reminded me to try the trick of disconnecting the internal backup battery and perform a full Power Manager reset. Nothing. The Duo wasn’t showing any sign of life.

(As you can see, at this point I could very well give a title to this saga, something like The vintage Mac conservator and the curse of the PowerBook Duo, but it seems there’s a happy ending after all.)

Now, if there’s one thing I’ve learnt after 30+ years of dealing with computers and related accessories is that everything can just stop working out of the blue, no matter its apparent reliability — and so I thought: what if the Duo’s AC power adapter is the culprit? Regrettably, I don’t have the necessary tools to test whether an adapter is working or not, so the only empirical test I could perform was to connect another adapter and see whether the Duo booted. The only viable candidate was the Macintosh PowerBook 45W AC adapter I use with my PowerBook 1400c.

AC Adapters

The connector is the same, but since it’s a more powerful adapter than the M2693 that came standard with the Duo, I was hesitant about connecting it right away. Checking the specifications, it appears that both adapters feed 24 Volts to the computer, but the slight difference in amperage (1.5A for the original Duo adapter, 1.875A for the 45W AC adapter) got me concerned. So I asked for advice on Twitter and other social networks. Thomas Brand chimed in and suggested that, provided the two adapters feed the same voltage and have the same polarity, there was no harm in connecting the 45W AC adapter to the Duo. Given his extensive experience, I trusted him and proceeded with the test.

The PowerBook Duo 280c booted instantly:

The Duo is alive

Conclusion

I apologise if it took me so long to get to the point of this post. I wanted to offer a good amount of context to explain how sad I felt when even this second Duo 280c unit appeared to be dead. I decided to write about this because perhaps there are other vintage Mac enthusiasts out there who encountered a similar situation and asked themselves: Could I just switch adapters? Will this other one work? In this case the swap worked. The general advice is: pay attention to the AC adapter’s specifications, and to the things Thomas Brand mentioned above. And be wary of third-party adapters, especially if they came cheap and from ‘unknown’ manufacturers. I hope this helps.

Reminder

As indicated in my vintage wishlist, I’m still looking for a PowerBook Duo 2300c, in whatever configuration provided the machine works. If you have one and want to donate it, I’ll assure you it will go to a good home, and I will pay the shipping costs, of course. Thank you for reading!

A modicum of synchronisation

I’m still irked by Dropbox dropping support of PowerPC Macs running Tiger and Leopard. I know I’m not a typical Mac user, and that expecting support for an architecture that — at least on the Mac — was left behind in 2006 is a bit too much, especially given the short memory technology has nowadays. Still, I use a bunch of PowerPC Macs as secondary machines, they’re still useful and capable enough. When I work on some of my projects away from home, I often leave the Intel Mac at home and bring with me one of my G4 PowerBooks. When Dropbox worked, my workflow was excellent. I kept everything in sync without effort. I started working on documents on the PowerBook G4 to finish them later at home on the MacBook Pro, and vice versa. It was a seamless process.

Dropbox wasn’t the only thing I used to keep stuff in sync, but it had the best interface for handling files. Now that I’m left without it, here’s a brief overview of the tools I still use — tools that still work on PPC machines — to retain a modicum of synchronisation between my PowerPC Macs and more modern Apple devices:

  • Notational Velocity — This is an amazing tool for keeping notes in sync. The app is a Universal Binary that works great on a system as old as Mac OS X 10.4 Tiger and as new as Mac OS X 10.11 El Capitan. The syncing service is through Simplenote, so all my notes and bits of text are also available and in sync on iOS devices thanks to the Simplenote app.
  • CloudApp — It’s a great software/service for quickly sharing screenshots and all kinds of different files (images, videos, code snippets, documents, etc.), and I also use it as a sort of ‘Dropbox Lite’ whenever I need to pass one or more files from my MacBook Pro to my G4 PowerBooks and vice versa. I was an early adopter, and version 1.x of CloudApp was available for PowerPC Macs running at least Mac OS X 10.5 Leopard. Surprisingly, it still works. Up until a few months ago, if you went to CloudApp’s Download page, you could still download older versions (unsupported, of course). Not anymore. But the WayBack Machine is your friend. And if that archived link should stop working as well, I have saved version 1.0.3 for PowerPC Macs here.
  • Firefox Sync — I only recently had the proverbial ‘eureka moment’, when I realised that by creating a Firefox account, not only could I keep browser tabs, bookmarks, passwords, history, add-ons and preferences synchronised between my MacBook Pro and my iOS devices, but I could also include my PowerPC Macs because TenFourFox supports Firefox Sync — at least for now. It’s great and very handy.
  • FTP — Always an option, of course. I resort to FTP when dealing with big files. I upload them on my server and use Transmit to handle my stuff. You can download older versions of Transmit from Panic’s archives at this page (the last version supporting PowerPC Macs should be 4.2 — You’ll still need to purchase a licence to use the app, naturally).

This is an important subject: having some form of synchronisation available to create a bridge between vintage Macs and modern devices is essential in order to keep older Macs useful. If you have other ideas, use other methods, or know about other applications/services which still support PowerPC Macs, feel free to chime in. Recently, I became interested in BitTorrent Sync, but it doesn’t explicitly support PowerPC Macs. However, by looking at the supported platforms, I was thinking that maybe there was a way to make the FreeBSD versions work… I’m not fluent enough in UNIX, though; if you are, your suggestions are welcome!

Accessing Gmail from an older version of OS X Mail

I have lost more than thirty minutes trying to solve a small but annoying problem. The solution is rather simple, but it may not be apparent at first. I hope this post can help others who have stumbled upon the same issue.

I have a low-traffic Gmail account I usually check on my Power Mac G4 Cube using Mail.app in Mac OS X 10.4.11. Since it’s low-traffic, I don’t check it very often. But today I felt that a check was long overdue, so I opened Mail, clicked the Get Mail button, and I was presented with the annoying dialog box I sometimes see when there’s a network problem, the password confirmation dialog box. It appears that the pop.gmail.com server rejected my account password, so I was prompted to insert it again. I did, repeatedly, but to no avail.

So I logged in via the Web interface — without any problem — and found a message from Google that told me Google prevented the sign-in because it is from “an app that doesn’t meet modern security standards.”

At first I thought Google had updated/changed the server ports for incoming/outgoing mail, and after tweaking a few settings (I had the outgoing server port still set to ’25’ instead of ‘465’), I tried again to download my email messages. No joy. I then tried to look for an answer in the Gmail support pages, but my frustration and annoyance prevented me from finding what I was looking for more promptly.

I was about to give up, when I noticed an error message in Mail from the Gmail server that thankfully contained the link I was searching, and access to Gmail from Mail.app under Mac OS X Tiger was restored. The essential page is this one: Allowing less secure apps to access your account. You have to make sure you reach this page after you have signed in the problematic account via the Web interface.

Look down the page until you find this bit:

Gmail less secure

Click on the “Less secure apps” section of MyAccount link and you’ll be taken to the Less secure apps page. Click the Turn on radio button to allow access for less secure apps. Now go back to Mail, check for new mail, and the messages should start downloading.

Again, I hope this helps. And I hope it’s clear that in so doing, you’re choosing to weaken the security of your Gmail account(s) in exchange for the convenience of accessing the account(s) from a vintage Mac with older software. In my case, it’s not an important or primary email account, I have been downloading mail on the Cube from that account for the past six years, and I wanted to continue to do so.

Finally: bringing Internet to my Colour Classic

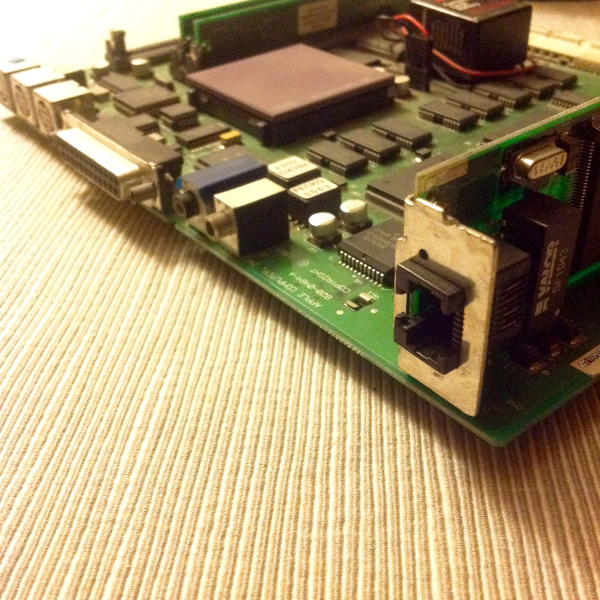
Among the various goodies Richard donated me there was an Apple-branded Comm Slot Ethernet card (Part № 820-0607-A), which I hoped I could attach to my Colour Classic to bring Ethernet connectivity — and therefore Internet — to my favourite compact Mac. Now, the original Colour Classic motherboard doesn’t have a Comm Slot interface, its only expansion comes in the form of a PDS slot. Luckily, years ago I also acquired the motherboard from a Macintosh LC 580, which fits perfectly in a Colour Classic and makes for a nice overall upgrade (it has a Motorola 68LC040 at 33MHz CPU versus the original 68030 at 16MHz of the Colour Classic, and the RAM can be expanded to a maximum of 52 MB instead of the meagre 10 MB of the original motherboard). The LC 580’s motherboard also sports a Comm Slot interface, and the aforementioned Ethernet card can be installed without problems [Update: It’s actually a Macintosh LC 575 motherboard; see my clarification]:

Comm Slot Ethernet card installed

The first snag I encountered was right when I attempted to insert the motherboard with the attached Ethernet card back inside the Colour Classic. The top edge of the card, in fact, collided with a piece of plastic inside the Mac’s chassis that helps to keep the cables of the hard drive power connector in place. I took measurements and, not without difficulty, managed to cut away exactly where the plastic was blocking the card’s passage. Once firmly inserted the motherboard, I turned the Colour Classic on. The Mac booted normally, but there was no video. Suspicions fell immediately on the new card. Since the system had no way of recognising it, I thought, perhaps it defaulted to thinking that a video card was inserted in the Comm Slot, so it shut down internal video and expected an external connection. I had to make the system recognise the card.

Fortunately I had my copy of Apple’s Network Software Installer 1.5.1 on a floppy disk, which updates AppleTalk to version 58.1.5 and installs the most updated versions of a series of network extensions and drivers. I turned the Mac off, removed the card, turned the Mac on again, inserted the floppy and launched the Installer. After a few moments, AppleTalk was updated, the Apple Ethernet CS driver and related extensions installed (the following screenshot comes from a previous attempt, before I updated to AppleTalk 58.1.5):

Network install

To see if everything worked, once again I had to turn the Colour Classic off, remove the motherboard, install the Ethernet card, reinsert the motherboard and turn the Mac on. This time there was video, and the Mac booted normally.

Another good sign was when I connected an Ethernet cable from my router to the Colour Classic: the LED above the port turned on (that didn’t happen when I first attempted an EtherTalk connection between the Colour Classic and the PowerBook 1400). At this point it was merely a matter of configuring MacTCP:

MacTCP
 
MacTCP setup

The easiest way to set things up in MacTCP is to do a manual configuration. I did things right thanks mostly to two useful resources: Vintage Mac World’s Old Macintosh System Software and TCP/IP page, and the fantastic Classic Mac Networking page (scroll down until you find the MacTCP section). On this page in particular was a really useful clarification:

It is a common mistake to associate the “Server” mode of MacTCP with “DHCP Server”: this is not the case. Server mode is used with hardware MacIP routers like the GatorBox which assign the client a specified IP address from a pool of IP addresses, or with PPP which does a somewhat similar affair.

So I simply selected Obtain Address Manually, specified a Class C Address in the IP Address area, and entered my provider’s DNS addresses in the Domain Name Server Information area.

At this point, the only thing that was missing to check if the connection worked was a browser. On another floppy I had a copy of one of the earliest Mac browsers, Samba (MacWWW). I installed it and launched it. It threw some errors because it attempted to load pages at the old CERN website that are no longer at the original addresses, but once I entered a valid URL (I figured the afore-linked page at Vintage Mac World was simple enough to be loaded correctly), the webpage loaded almost instantly. I had to share my triumph:

But MacWWW 1.03 is indeed a very old browser, and today’s Web, unless you really know where to look, is too complex for this browser to load pages properly without throwing a bunch of errors. The day after I found a slightly newer browser in MacWeb 2.0. After installing it, and pointing it to the same Vintage Mac World’s webpage, the result was definitely prettier:

MacWeb 2.0

This browser, like MacWWW, can’t handle secure connections and the like, but at least is capable of loading embedded images in HTML pages correctly. The overall responsiveness is remarkable, considering the age of the hardware and the software involved.

I’m so happy that I’ve finally managed to bring the Colour Classic online. Not that I’m planning to browsing the Web much on this machine, but now that I know that it can access the Internet, I’m ready to move on to the next step, which involves configuring an email client and an email account, and even an FTP client (I’m thinking an old version of Fetch), so that I can exchange files with the Colour Classic via my own server if need be.

A hard drive for the SE/30 — The long rescue

After the unexpected setback with the hard drive extracted from the Quadra 950, I once again rummaged inside a couple of boxes with stored assorted vintage stuff in search of a possible candidate. I found a few hard drives (both SCSI and IDE) in “I honestly don’t remember” conditions, so I took out three SCSI drives and put them in my external drive enclosure, connected to the Macintosh Colour Classic. The first drive, a 500 MB Quantum-something, made a few terrible clicks while trying to mount, and repeatedly failed. The second, a nice 9 GB Seagate ST39140N made a low humming noise when I powered up the SCSI enclosure, then silence. All the diagnostic tools at my disposal didn’t even detect its presence on the SCSI chain. The third, a surprisingly compact and lightweight 1.2 GB Quantum Fireball drive, powered up and made all the right little noises that indicate a possibly functioning hard drive. Also, it was immediately detected on the SCSI chain, and FWB Mounter gave me hope:

FWB Mounter

There it was, SCSI ID 4, “Recoverable”. And the adventure began.

I tried to mount it with FWB Mounter, but mounting failed after two long minutes during which the Mac appeared completely frozen. I launched FWB Hard Disk Toolkit 2.5, but the result was the same. My initial approach, I have to say, was to try to read and/or salvage any useful data stored on the drive before attempting a reformatting. Then I remembered I had a CD-ROM with a copy of DiskWarrior for the classic Mac OS (version 2.1, I think), so the fastest route was switching to a Mac with both a CD-ROM drive and a SCSI port. The PowerBook G3 Lombard was at hand, and fit the criteria. I booted in Mac OS 9.2.2, launched DiskWarrior, but it didn’t even detect the Quantum hard drive in the SCSI enclosure. I rebooted in Mac OS X Tiger and tried DiskWarrior 3 under Mac OS X. Same result. I rebooted again in Mac OS 9.2.2 and launched Disk First Aid, which did detect the drive but gave up almost immediately during the verification process, saying something along the lines of “This disk has too many errors and I can’t repair it.”

Since I still have all my Compact Macs out these days after performing a general check-up on them, I took the Macintosh Classic, connected the SCSI drive enclosure to it, and launched Norton Disk Doctor. At first, it didn’t detect the Quantum drive, but after issuing the “Show Missing Disks” command, the drive showed up. Clicking on Examine started a very long process where Norton Disk Doctor appeared to be running in slow-motion. After twenty minutes with the progress bar in the “Checking for bad blocks” test that was not progressing, I skipped the test (as soon as the Mac registered my input). When it came to checking the drive’s directory structure, Norton Disk Doctor kept throwing alarming errors. It indeed tried to fix a few issues, but I was starting to get the feeling that whatever had been on that drive was irrecoverable.

From that point on, I dropped any attempt to diagnose or repair the drive and focussed on actually trying to format and mount it.

On the Macintosh Classic I have an older version (1.8) of the FWB hard disk utilities, so I launched HDT Primer and see what it could do. HDT Primer recognised the drive and let me perform a low-level formatting, warning that the operation would take 81 minutes. I let it work and went to my studio to take care of other business. When I returned to the living-room after about an hour, HDT Primer was already done, and a dialog box informed me that the hard drive had been successfully formatted. So I went and tried to initialise/partition it, but unfortunately I kept getting errors.

Another frustrating chapter was beginning: trying different applications (on different Macs) to create partitions and logical volumes on the disk. Since I knew that that Quantum Fireball drive had bad sectors, I figured that the best course of action was attempting to partition it in different ways, so that maybe I could at least get to a point where, say, two out of three or four partitions were in a good-enough state to be mounted as volumes. After many, many fruitless efforts, and with Apple’s Drive Setup being this close to succeeding, my friend Grant Hutchinson suggested I tried using Silverlining Pro. I looked in my archives and found an old copy of Silverlining, then a newer one (Silverlining Pro 6.1). Thanks to Silverlining Pro 6.1 I could install a proper driver on the drive and managed to create two partitions of roughly 600 MB each; then, with version 6.5.8 I was finally able to initialise and mount one of those partitions.

I then used Norton Disk Doctor again to see whether such partition was good enough — and again, the “Checking for bad blocks” test was taking an inordinate amount of time, so I skipped it, assumed there were bad blocks, and let Norton perform the remaining tests. The disk passed them all, and knowing that the directory structure was sound was enough for me. With the disk now mounted on the PowerBook 1400’s desktop, I carried out some informal tests of my own, copying files to and from the partition (which I simply called “Q1”), launching applications from Q1, unmounting and mounting Q1 several times, and so forth. All went well, and I was actually surprised at seeing how fast this drive is in reading/writing files. Again, thanks to Silverlining Pro I was able to instruct the drive to mount automatically the Q1 partition when connected. Then I powered off the SCSI enclosure, disconnected the drive, changed the jumper configuration so that the SCSI ID was 0 instead of 4 (as it should be for an internal drive), opened the Macintosh SE/30 and mounted the Quantum Fireball hard drive on the metal shelf.

Drive inside the SE30

As you can see, the Quantum Fireball drive is rather slim (just so you have an idea: the former 40 MB beast of a hard drive that was inside the SE/30 weighed 850 grams, this Quantum Fireball weighs less than 250 grams).

I closed the SE/30, connected it to the mains, and turned it on for the moment of truth.

Silverlining

This, appearing at startup, was comforting. Then of course I got the floppy icon with the flashing question mark. Normal, since there wasn’t yet a valid system software installed on the drive. So I took the original set of floppy disks for System 7.0 and inserted the first one. After choosing a System 7.0 installation tailored for the Macintosh SE/30, it was time to see whether the Installer would recognise the Q1 partition… and it did! Once installation was complete, I restarted the SE/30 and it booted into System 7 in roughly 20 seconds. I was amazed and also very happy that my efforts and the time spent on this hadn’t been a complete waste…

Q1 mounted

So now the Macintosh SE/30 has a working-enough hard drive. Of course, it’s a temporary solution (the drive has a fair amount of bad sectors), but for now it’s usable, and even if I cannot take advantage of all the original 1.2 GB of storage space, a 620 MB partition for this system is far more than enough.

Careful with that Quadra drive

When I was talking about my Macintosh SE/30 in the previous article, I wrote:

The SE/30 is the most powerful and expandable of the Compact Macs I have, and I plan to do what I can to keep it in operation. At first I thought I had no useful hard drive substitute, but then it occurred to me that since my Quadra 950 isn’t currently working, I could transplant the Quadra’s internal hard drive (a 400 MB unit) into the SE/30, so I can still use the SE/30 and put an otherwise idle hard drive to work at the same time. A bit of a win-win situation.

Yesterday I did the hard drive transplant, and the outcome was, well, unexpected to say the least. But I think I’ve learnt something that’s worth sharing.

Here are two photos of the hard drive that was in my Quadra 950:

Quadrahd1.jpg


Quadrahd2.jpg

It’s a 400 MB Seagate ST1480N manufactured in 1991 at the latest. This drive has the same imposing size as the 40 MB Quantum ProDrive in the Macintosh SE/30, but I had to be a bit creative when mounting it on the drive shelf, because the side holes were located in different places and I couldn’t insert the screws in the same way as the previous Quantum drive that was inside the SE/30. Long story short, the procedure took me longer than expected, and when I finally reassembled the Macintosh SE/30, connected the mouse and keyboard, and connected the Mac to the mains… It didn’t turn on.

My first thought: Unbelievable… Is the power supply gone? Now? I was really bummed, for that was surely the worst timing ever. I honestly wasn’t blaming the hard drive because in all these years dealing with vintage technology (and back then, when it was current), I had never encountered an instance where a drive was preventing a Mac from even turning on. And I was sure I didn’t touch anything on or near the power supply circuitry. Still, there were no strange smells coming from the Mac, and that was kind of a positive sign. I opened up the SE/30 again, removed the hard drive, closed the SE/30, flipped the power switch again… And it booted just fine.

It was the drive, then. But how could that happen? It really was a first for me. Intrigued, I inserted the drive in the external SCSI enclosure I keep handy, and guess what? It didn’t turn on either (the power LED was just flashing, and no sounds came from the enclosure). Maybe there was something to change in the drive’s jumper configuration, but a quick check revealed that all was OK in that regard.

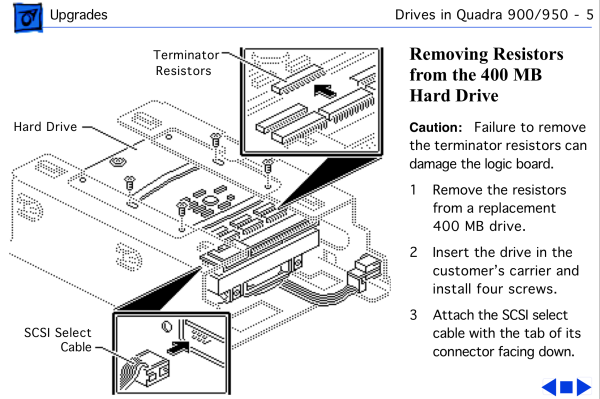
On a hunch, I went digging in my personal archive of Apple Service Source Manuals in PDF format. There was a document, downloaded from the Web not long ago, with the promising title Hard Drives. I opened it, and I found something interesting in a section called Drives in Quadra 900/950:

hdmanual-1.png
hdmanual-2.png

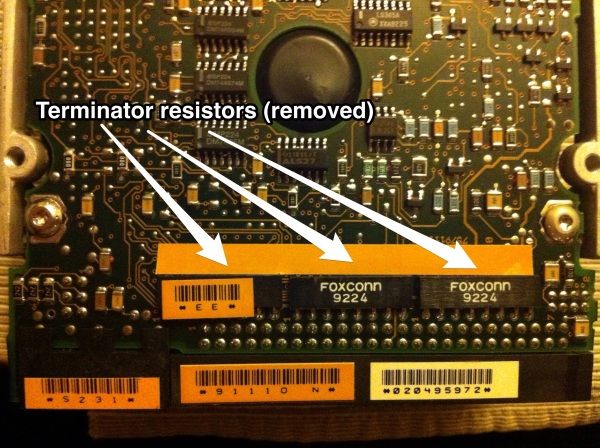
As you can see from the two figures, it appears that you have to ‘prepare’ a drive to be used inside a Quadra 900/950, by removing the terminator resistors. If you look at the second figure, those terminator resistors can be reapplied in case the hard drive has to be repurposed in another Mac or external enclosure (at least on the 400 MB model). I’m out of luck, though, because the 400 MB Seagate drive I have here was either part of the stock drives my Quadra 950 originally had, or it was prepared by the Quadra’s previous owner.

resistors-removed.jpg

The bottom line is that, in its current configuration, I can only use this hard drive in my Quadra 950 and nowhere else, and the Quadra isn’t working at the moment. That’s disappointing, and also a waste, since the drive works — well, it worked the last time I used the Quadra.

If you’re parting out a Quadra 900 or 950, keep this in mind in case you’d like to use one or more of the Quadra hard drives in another Mac. You also might acquire a Mac that doesn’t turn on: disconnect the hard drive and try turning the Mac on again. Maybe the previous owner put a drive that came from a Quadra thinking that it just was interchangeable. Not a likely scenario, but it’s rather quick check to perform, just in case.

This is what I’ve been able to ascertain from my tests and (limited) research, and I hope it helps. But if something I wrote is incorrect, or your experience is different, please let me know. Thank you.

Compact Flash performance on the PowerBook 5300: very first impressions

In my article about the recently received PowerBook 1400c, I wrote:

The intriguing part of this setup is booting from the Compact Flash card: everything is even more responsive (opening applications, opening files, saving files) and the PowerBook becomes practically silent. […]

Just for fun, I performed an informal test. I booted the PowerBook 1400 in Mac OS 8.1 from its internal hard drive, then I booted in Mac OS 7.6.1 from the CF card, then I booted in Mac OS 8.6 from the PCMCIA Toshiba hard drive, measuring boot times using my iPhone’s stopwatch (all the following are cold boots, not just restarts; all times are approximate):

  • Internal hard drive (Mac OS 8.1): 54 seconds.
  • Compact Flash card (Mac OS 7.6.1): 47 seconds.
  • PCMCIA hard drive (Mac OS 8.6): 1 minute, 12 seconds.

As you can see, on this PowerBook 1400c there isn’t a dramatic difference between booting from the internal hard drive and from the Compact Flash card. Maybe it’s because the hard drive isn’t a bad performer after all; maybe it’s because of the G3/333 processor upgrade; I don’t know. Earlier today I wanted to test a hunch I had — that the Compact Flash solution would be an even better alternative for my PowerBook 5300. This machine has just a 117 MHz processor, and a noticeably slower hard drive than the one in the PowerBook 1400.

So I inserted the Compact Flash card with Mac OS 7.6.1 in the PowerBook 5300 and performed the same test as quoted above. First I booted the PowerBook 5300 from its internal hard drive, then I selected the CF card in the Startup Disk control panel, turned off the machine, and booted it from the CF card, again measuring boot times with a stopwatch. The results:

  • Internal hard drive (Mac OS 8.1): 2 minutes, 30 seconds.
  • Compact Flash card (Mac OS 7.6.1): 1 minute, 5 seconds.

Less than half the time when booting from the CF card! True, those are two different versions of Mac OS, but the amount of extensions loaded during start-up is more or less the same.

After starting the PowerBook 5300 from the CF card, I opened control panels, applications, files, and the PowerBook 5300 felt way more responsive than when operating from the internal hard drive. And considering how noisy the 1.1 GB IBM hard drive is, one really appreciates the quiet when working from the Compact Flash card.

As I said, these are just very first impressions, and I’ll perform a more thorough investigation in the following days, but what I’ve seen so far has left me rather amazed. I expected a better performance overall, since that internal hard drive is definitely a slug, but the difference is noticeable even after a cursory examination.

Checking on my Quadra 950

Quadra950 bezel close cc


It didn’t boot.

Compared to other Macs in my collection which have been in storage for a longer period (the LC II, for instance, or the Performa 630CD), I used this Quadra 950 for the last time around the second half of 2011, so it’s been a little more than two full years. Of course everything was working fine and, knowing I wouldn’t use it for a while, I stored the Quadra carefully, taking particular care in covering vents and other holes to avoid the excessive formation of dust bunnies.

Before connecting the Quadra to keyboard, mouse and display, I opened it to take a cursory look at the amount of dirt that accumulated inside of it since the last time I used it, but finding it rather clean overall, I went on and flipped the switch (actually I pressed the Power button on the keyboard).

The Quadra’s response: “KH-POP”, and nothing else.

Typically this beast of a computer, with a power supply capable of delivering 303 watts of maximum continuous power (you can, for example, connect an external display to the Quadra 950 PSU and the Quadra will power itself and the display), would make a sort of “KH-DUM” sound when powered on, followed by the spinning up of the various drives and the large fan mounted against the power supply. Instead all I got was a “KH-POP,” the power light would briefly turn on, and nothing else. The Quadra 950 has a security keyswitch on the front, with three positions: OFF, ON and SECURE. According to this archived Apple Knowledge Base article,

When the keyswitch is in the SECURE position, the ADB devices and floppy disk drive are disabled. For example, the keyboard does not generate characters, or the mouse moves but no menus can be pulled down. Also, when power is applied to the computer while the keyswitch is in the SECURE position, the computer automatically starts up.

Turning the keyswitch in the SECURE position made my Quadra 950 cycle in a scary loop of “KH-POP KH-POP KH-POP” — it was clear that the Quadra tried to power on but could not. A very faint burnt smell was not a good sign, either.

My first thought was: The power supply has bitten the dust, but I had my reservations. True, long periods of inactivity aren’t good for vintage Macs (or any computer, for that matter), but the Quadra 950’s power supply is considered one of the most robust, and I found it unlikely that it would give up the ghost this way. It’s just a feeling, of course, but something that happened later in my investigation may corroborate my instincts.

Cleaning out

I disconnected everything and started the cleaning process. I wanted to be as thorough as I could, and that meant removing the drive shelf and the power supply, then removing the large fan mounted on the power supply, inspecting each part and cleaning it gently. Then I removed all the connected NuBus cards and dusted them one by one; then I dusted the motherboard.

Power supply

As you can see, the power supply occupies a large part of the Quadra 950’s interior. In that empty space above it there’s the drive shelf (which I had already removed when I took the photo).

The amazing thing to note with regard to disassembling the Quadra 950 is how simple and straightforward it is. To remove the drive shelf I only had to remove two screws. To remove the power supply — just three screws. (Of course you also have to disconnect the various data cables and power cables).

Quadra950 inside motherboard

Here’s the Quadra without drive shelf, power supply, speaker bezel. I also removed one of the NuBus cards (the second from the top — I have four slots occupied of the five available) to be able to disconnect all data cables with greater ease.

This photo was taken before I dusted everything. As you can see, the Quadra was already rather clean inside.

The NuBus cards

For documentation purposes, let’s have a quick look at the four NuBus cards installed.

Asante Ethernet 2

1. AsanteFAST 10/100 NuBus Ethernet card by Asanté (Manufacture date appears to be 1996)

Paintboard TurboXL 1

2. Paint Board Turbo XL video card by RasterOps (Manufacture date appears to be 1993)

4 serial ports card

3. This one was hard to identify. It basically adds 4 serial ports to the Mac. After some digging, it appears to be either a Lightning or a Hurdler serial NuBus board manufactured by Creative Solutions, Inc. (“CSI”, as you can see on that label on the chip next to the large Zilog chip) in 1994. Here’s the related page from the original website (now archived).

Macintosh II PC Card

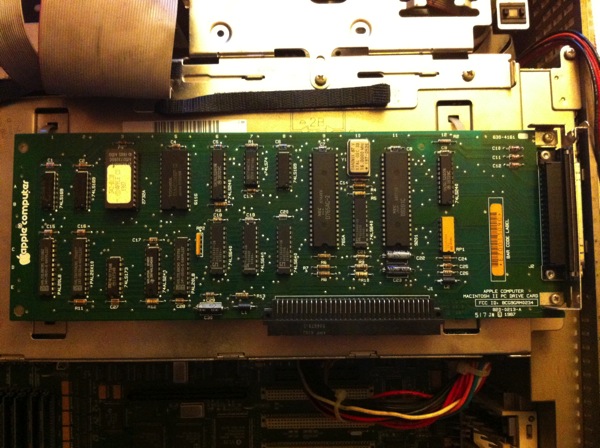
4. This one, instead, was very easy to identify. It’s a Macintosh II PC Drive Card by Apple Computer (part No. 820-0213-A). You can find more photos of this card here. It’s a rather old card (1987) that lets you connect an Apple PC 5.25″ floppy drive. I don’t have such drive — this card was already in the Quadra when I acquired it in 2003.

After the cleaning

After dusting and cleaning everything, I reassembled the Quadra and tried booting it again. And again, the Quadra’s response was “KH-POP,” just like before. But this time, since the room was darker, I could notice a spark on one of the NuBus cards every time I heard the “KH-POP” sound. I am not an electrician, but I’d say that this behaviour suggests that the issue may be on the motherboard (or on something connected to it, such as RAM chips or one of the NuBus cards, etc.) and not in the power supply. It looks as if every time I try powering the Quadra on, something creates a short circuit, interrupting the process. Perhaps a piece of dirt or a ‘dust bunny’ has lodged somewhere and I didn’t catch it, or a RAM chip has failed. Searching on the Web, I found someone having a very similar issue with his Quadra 950, but in his case the short circuit was caused by a pin of the main processor chip that he bent when he reinserted it after cleaning the motherboard. I haven’t touched any chip, and every RAM and VRAM memory stick looks firmly in its place.

I have already tried booting the Quadra after removing all the NuBus cards, but it went “KH-POP” again on me. Tomorrow I will try removing all RAM chips and even the PRAM battery, and see what happens.

I’m quite fond of this Quadra 950. I’ve used it on a regular basis from 2003 to 2006, and occasionally up to 2011. It’s the fastest 68K Macintosh I own (it has a Motorola 68040 CPU at 33MHz, two 400MB hard drives, and it used to have 28MB of RAM, which I expanded to 40MB by adding the RAM sticks I salvaged from the Quadra 700 when it died in 2005) and acted as a server in my vintage Mac LocalTalk network. I don’t want to give up on it yet. I’ve described the issue the best I can, so if you have any insight or suggestion, please do chime in — I’m all ears.


Quadra950 rear label

Some options for reading RSS feeds on the classic Mac OS

Continuing my investigations into various types of software to keep using a vintage Mac for modern tasks, after browsers and email clients, it’s time for RSS feeds reading. What are the options? Rather limited, as you may guess, but not so limited as to make the experience impossible.

  1. Google Reader inside a browser. It’s the best, most up-to-date, most compatible way to read feeds and keeping them in sync if you’re also using a modern Mac with another RSS reader that syncs with Google Reader. The only problem appears to be the browser, at least with the few tests I’ve conducted. Netscape Communicator 4.78 and Opera 6.03 didn’t load anything; with Internet Explorer 5, Google said that “Your browser’s cookie functionality is turned off”, despite having the “accept all cookies” setting enabled in the preferences; iCab 2.99 (under Mac OS 9.1), iCab 3.0.5 (under Mac OS 9.2.2 in the Classic Environment), and Classilla 9.2.1 (both under Mac OS 9.1 and in the Classic Environment) started loading the Google Reader page after logging in but didn’t go further (of course JavaScript was turned on in Classilla for all the pages in the google.com domain). I’m listing this option anyway, because perhaps with a different Mac configuration you might be able to achieve better results than mine.
  2. Another form of ‘inside the browser’ RSS reading. AmphetaDesk is a separate app but loads content into the browser. Worth noting is that AmphetaDesk is open source and cross platform, and you’ll find versions for Mac OS 8-9, Mac OS X, Linux and even for Windows 95 and 98. I tested it on my Power Macintosh 9500 with Mac OS 9.1 and works fine.
  3. Standalone applications:
    • BottomFeeder looks interesting and, like AmphetaDesk, is available for a slew of platforms. But I can’t seem to make the Mac OS 8/9 version work. It looks as if the zipped archive wouldn’t expand correctly. The only executable file appears to be ‘Visual’ but nothing really happens when I double-click it. I figured I’d mention it anyway, perhaps I’m missing something obvious and you’ll manage to make it work.
    • Acuity is an interesting option and probably the only one left if you’re running anything older than Mac OS 9. According to its webpage, Acuity can run on a Mac with Mac OS 7.6 or greater, but what’s even better is that it can run on 68k Macs as well. Furthermore, it’s still under development. The interface is simple and bare-bones, but the application does its job: it displays news headlines and a short summary when you click on one of them. There’s a subscription manager that lets you add feeds, and by double-clicking on a headline you’ll be able to read the story in full on your default browser (if it’s not open, Acuity will launch it). It’s my favourite solution: tested and working on a PowerBook 5300 with Mac OS 8.1, on a Power Macintosh 9500 with Mac OS 9.1 and on a PowerMac G4 Cube under Classic (Mac OS 9.2.2). As the author warns, the application may exit with “unhandled nil object exception” errors every now and then, but not so frequently as to feel buggy and unreliable, at least in my experience.

The search for further options goes on, of course, but for now I wanted to give you a first round of results and ideas to start with. If you want to add other RSS readers you’ve found or share other solutions for reading feeds on a vintage Mac, I encourage you to do so in the comments.